PhotoCatch | Déclenchement Automatisé D’un Appareil Photo D90 à Partir D’un Capteur De Mouvements Et D’un Arduino

| Comments

Dans mon dernier post, je parlais de notre réalisation lors du FabLab à savoir :

Un appareil photo avec déclenchement automatisé via un capteur de mouvement et un arduino.

Aujourd’hui, je vais détailler le montage de cette réalisation.

PhotoCatch

Le matériel

1
2
3
4
5
6
7
8
Un boîtier NIKON D90
Une télécommande filaire premier prix (Disponible [ici][1])
Un arduino uno
Un servomoteur
Un capteur ultrasons
Une breadboard
Quatres afficheurs 7 segments
Une touche de talent

PhotoCatch – Etape par étape

Principe de PhotoCatch

Achat de la télécommande

  1. La première étape consiste à acheter une télécommande qui va piloter le déclenchement de l’appareil photo. Celle ci suffit amplement : http://quent.in/Af9bg0
  2. Couper délicatement l’extrémité de la télécommande afin de ne pas détériorer les 3 fils qui se cachent sous la gaîne en plastique.

Parmis ces 3 fils, on trouve un fil blanc, jaune et rouge.

  • Le contact du fil blanc (masse) et jaune permettent de faire l’autofocus.
  • Le contact  du fil blanc (masse) et du fil rouge permettent de déclencher la capture.
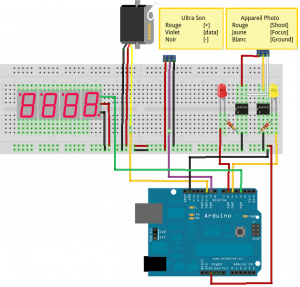
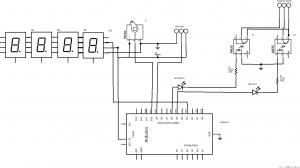
Schémas de montage

Réalisés sous Fritzing – http://fritzing.org

  • 2 optocoupleurs pour contrôler le mécanisme de focus et de shoot (et d’isoler l’appareil photo du reste du circuit) ;
  • 1 capteur ultrasons permettant de calculer la distance d’un obstacle (30° d’ouverture) ;
  • 1 servomoteur permettant au capteur ultrasons de balayer un champ plus large (180°) ;
  • 4 afficheurs 7 segments permettant de compter le nombre de photos prises.

PhotoCatchV1_schema PhotoCatch_wire

Code arduino

Le code est disponible dans son intégralité sur GitHub : https://github.com/2xyo/fablab/blob/master/photocatch/src/photocatch.ino

1
2
3
4
5
6
7
8
9
10
11
12
13
14
15
16
17
18
19
20
21
22
23
24
25
26
27
28
29
30
31
32
33
34
35
36
37
38
39
40
41
42
43
44
45
46
47
48
49
50
51
52
53
54
55
56
57
58
59
60
61
62
63
64
65
66
67
68
69
70
71
72
73
74
75
76
77
78
79
80
81
82
83
84
85
86
87
88
89
90
91
92
93
94
95
96
97
98
99
100
101
102
103
104
105
106
107
108
109
110
111
112
113
114
115
116
117
118
119
120
121
122
123
124
125
126
127
128
129
130
131
132
133
134
135
136
137
138
139
140
141
142
143
144
145
146
147
148
149
150
151
152
153
154
155
156
157
158
159
160
161
162
163
164
165
166
167
168
169
170
171
172
173
174
175
176
177
178
179
180
181
182
183
184
185
186
187
188
189
190
191
192
193
194
/*
||
|| @author Yohann Lepage
|| @author Quentin Rousseau
|| @version 0.2
||
|| @description
|| PhotoCatch prend automatiquement une photo lorsque
|| quelqu'un passe devant l'appareil grace à son capteur
|| à ultra-son
||
*/

#include <Servo.h>
#include <SoftwareSerial.h>
#define DEBUG true

// Librairies utilisées
// http://arduino.cc/en/Tutorial/Sweep
// http://arduino.cc/en/Tutorial/Ping

//7 Segments
int rxSegPin =  0;
int txSegPin  = 3;
int photosCounter = 0;
SoftwareSerial segSerial = SoftwareSerial(rxSegPin, txSegPin);

// Ultra Son
// Pin Ultra son
int pingPin = 9;
int val = 0;
int ultrasoundValue = 0;
int timecount = 0; // Echo counter

// Appareil Photo
// Pin Focus
int focusPin = 5;
// Pin Shoot
int shootPin = 6;
// Durée du focus
int focusTime = 0;

// Distance pour le shoot
int shoot_threshold = 100;

// Servo Moteur
Servo myservo;
// Pin Servo
int servoPin = 10;
// Position du Servo Moteur 0 - 180° 
int pos = 0;

// Démarrage de l'Arduino
void setup()
{
    //Serial pour mode DEBUG
    if(DEBUG)
      Serial.begin(9600);
    // Attachement du servo au servoPin 
    myservo.attach(servoPin);
    // Passage en mode Output pour l'ultra son
    pinMode(pingPin, OUTPUT);
    // Passage en Output pour le focus
    pinMode(focusPin, OUTPUT);
    // Passage en Output pour le Shoot
    pinMode(shootPin, OUTPUT);
    // Passage en low des focus et shoot
    digitalWrite(focusPin, LOW);
    digitalWrite(shootPin, LOW);
    //7 Segments
    segSerial.begin(9600);
    pinMode(rxSegPin, INPUT);
    pinMode(txSegPin, OUTPUT);

    segSerial.print("vv");
    //Turn Colon Off
    segSerial.print('4d',HEX);
    segSerial.print('00',HEX);
}

// Démarrage de la boucle principale
void loop()
{
  // Appel à la méthode de balayage grace au servo
    sweep();
}

// Détection d'un objet
void sonar()
{
   // establish variables for duration of the ping, 
   // and the distance result in inches and centimeters:
   long duration, inches, cm;

   // The PING))) is triggered by a HIGH pulse of 2 or more microseconds.
   // Give a short LOW pulse beforehand to ensure a clean HIGH pulse:
   pinMode(pingPin, OUTPUT);
   digitalWrite(pingPin, LOW);
   delayMicroseconds(2);
   digitalWrite(pingPin, HIGH);
   delayMicroseconds(5);
   digitalWrite(pingPin, LOW);

   // The same pin is used to read the signal from the PING))): a HIGH
   // pulse whose duration is the time (in microseconds) from the sending
   // of the ping to the reception of its echo off of an object.
   pinMode(pingPin, INPUT);
   duration = pulseIn(pingPin, HIGH);

   Serial.print(microsecondsToCentimeters(duration));
   Serial.print(" cm\n");

   if(microsecondsToCentimeters(duration) <= shoot_threshold)
   {
     shoot();
   }

   delay(150);
}
// Balayage avec le Servo
void sweep()
{
    for(pos = 0; pos < 90; pos += 1) // goes from 0 degrees to 180 degrees

    { // in steps of 1 degree
        myservo.write(pos); // tell servo to go to position in variable 'pos'
        //delay(15); // waits 15ms for the servo to reach the position
        sonar();
    }

    for(pos = 90; pos >=1; pos-=1) // goes from 180 degrees to 0 degrees

    {
        myservo.write(pos); // tell servo to go to position in variable 'pos'
        //delay(15); // waits 15ms for the servo to reach the position
        sonar();
    }
}

long microsecondsToCentimeters(long microseconds)
{
   // The speed of sound is 340 m/s or 29 microseconds per centimeter.
   // The ping travels out and back, so to find the distance of the
   // object we take half of the distance travelled.
   return microseconds / 29 / 2;
}

//Display Photos Counter on the 7 Segments Display
void displaySeg()
{
  photosCounter = photosCounter +1 ;

  if(photosCounter < 10)
  {
    segSerial.print("   ");
    segSerial.print(photosCounter);
  }
  else if(photosCounter < 100)
  {
    segSerial.print("  ");
    segSerial.print(photosCounter);
  }
  else if(photosCounter < 1000)
  {
    segSerial.print(" ");
    segSerial.print(photosCounter);
  }
  else
  {
    segSerial.print(photosCounter);
  }

  Serial.print("Compteur photos : ");
  Serial.print(photosCounter);
  Serial.print("\n");
}

// Capture d'une photo
void shoot()
{
    // Focus
    digitalWrite(focusPin, HIGH);
    delay(focusTime);

    // Déclenchement de la photo 
    digitalWrite(shootPin, HIGH);
    delay(200);

    displaySeg();

    //  Remise à 0 des Pins
    digitalWrite(focusPin, LOW);
    digitalWrite(shootPin, LOW);
}

Démonstration par mon collègue Yohann Lepage (@2xyo)

Bonus – Timelapse de l’explor’Camp par PhotoCatch :

Evolution possible

  • Utiliser « Picture Transfert Protocol » qui permet de contrôler beaucoup plus de paramètres tels que l’ouverture de l’objectif, la vitesse et même la récupération des photos. Tout cela par contrôle USB.

More…